
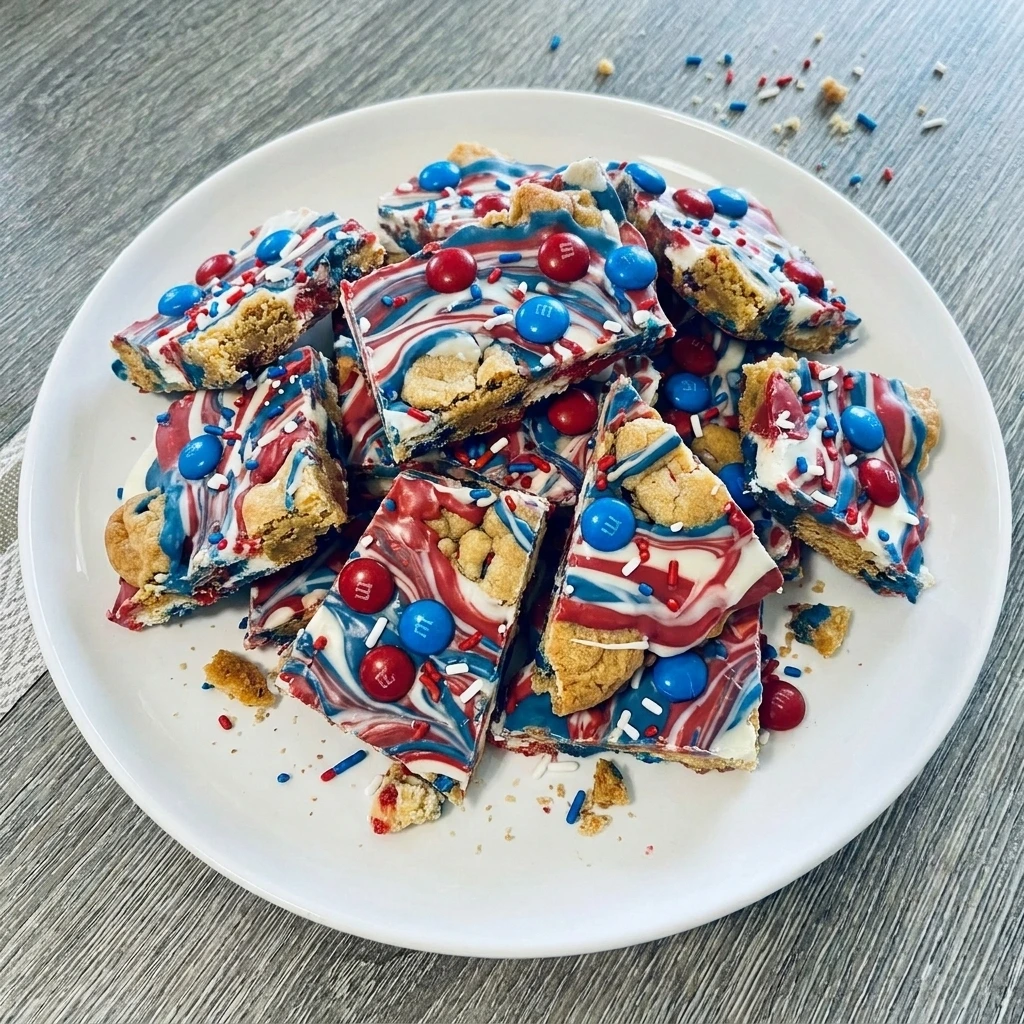
This crunchy and colorful Patriotic Red White and Blue Cookie Bark comes together with layers of melted chocolate and cookie pieces and meanwhile it delivers all the fun and sweetness you want from a festive dessert treat in every bite! With simple pantry ingredients and cheerful candy toppings and this cookie bark recipe comes together so quickly and totally satisfies every sweet craving during summer celebrations.
Like the Red White and Blue Dirt Cups and meanwhile the Vanilla Pudding Dessert Cups (Party Idea) this Patriotic Red White and Blue Cookie Bark is perfectly festive and colorful and it is incredibly easy to prepare for parties and holiday weekends. Even though this dessert looks impressive and cheerful and meanwhile it only takes a few quick steps to create the layered candy coated texture everyone loves.
Because this bark recipe uses melted white chocolate sandwich cookies and colorful candies and meanwhile you do not need complicated baking techniques or fancy decorating supplies. The uneven swirls crunchy cookie pieces and scattered candy toppings create a homemade dessert that feels playful festive and perfect for sharing during patriotic celebrations.
Ingredients
Here is what I use for this recipe and you can adjust nuts or spices based on preference:
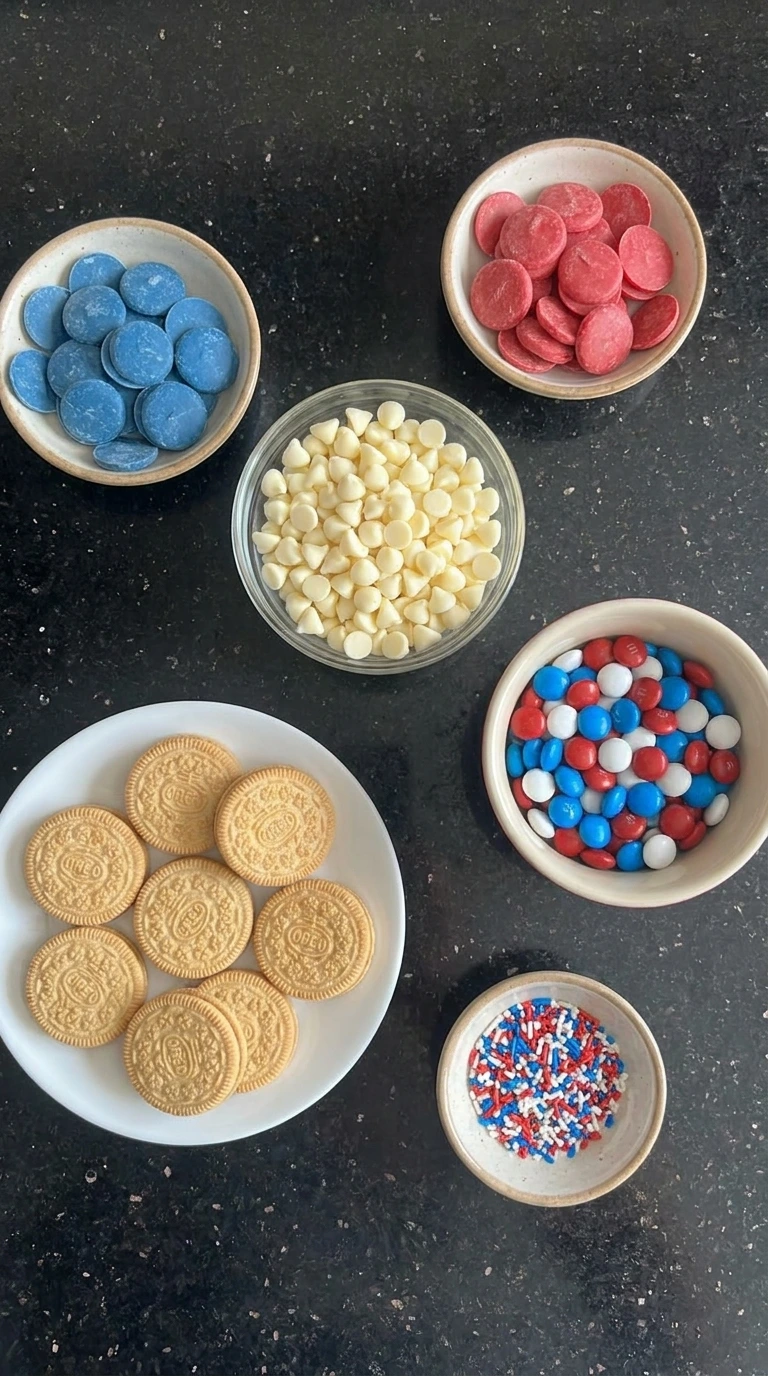
- white chocolate chips: Melted to create the creamy sweet bark base with smooth texture and rich flavor.
- blue candy melts: Swirled into the bark for bright patriotic color contrast and decorative texture.
- red candy melts: Added for bold festive streaks and colorful holiday appearance.
- vanilla sandwich cookies: Broken into uneven chunks to add crunch and layered cookie texture throughout the bark.
- red white and blue candy coated chocolates: Scattered over the melted chocolate for colorful crunch and decorative topping.
- patriotic sprinkles: Sprinkled across the surface to create festive texture and playful color.
Tools You’ll Need
- microwave safe bowl: melts the chocolate and candy melts evenly.
- ceramic baking dish: holds the bark mixture while it sets and firms.
- spoon: swirls the melted candy colors through the bark.
- measuring cups: measures candy and chocolate ingredients accurately.
Instructions
Step 1: Break the sandwich cookies
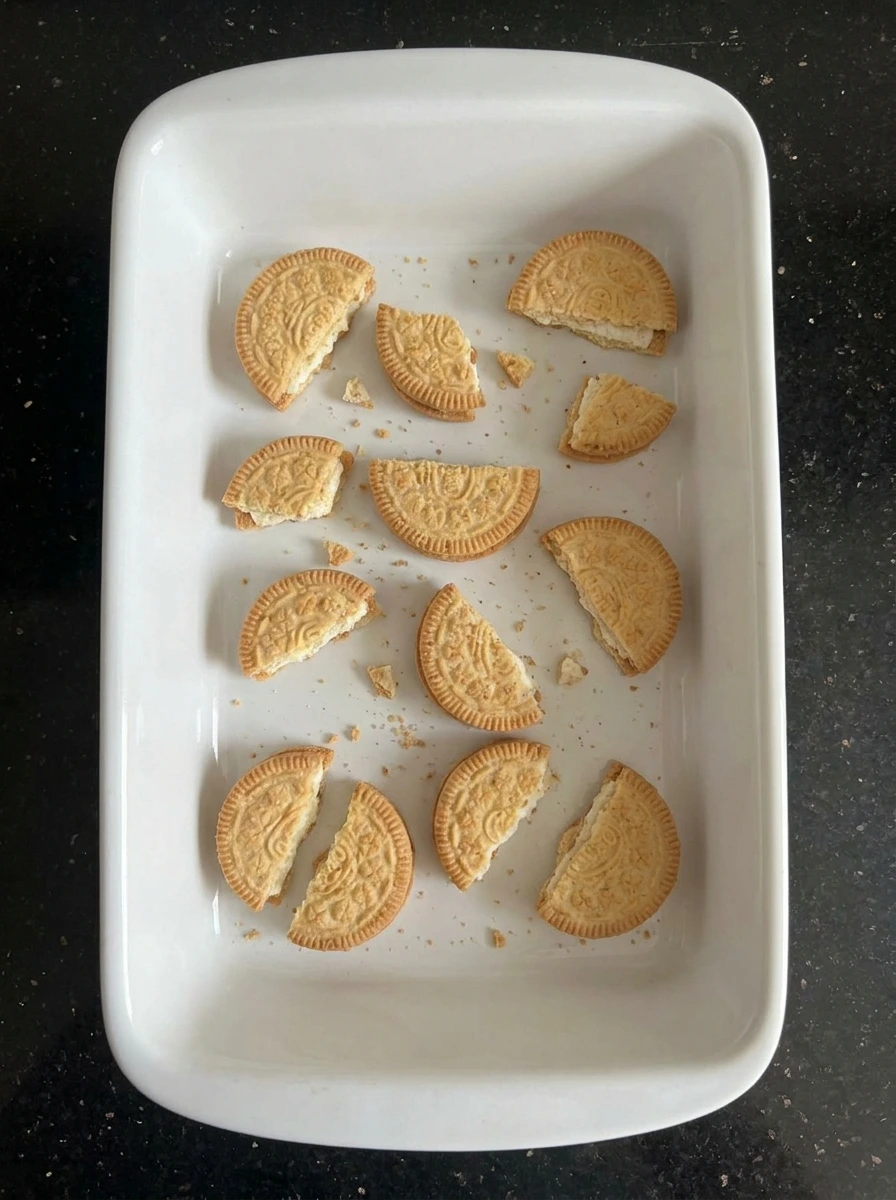
Break the vanilla sandwich cookies into uneven chunky pieces and meanwhile leave a mixture of large and small pieces for natural texture throughout the dessert. Some crumbs should fall loosely around the larger cookie chunks for a homemade appearance. Scatter the cookie pieces loosely so they overlap naturally and avoid perfectly even shapes or spacing. The rough cookie edges and irregular chunks create a more realistic party dessert texture.
Tip: Keep some larger cookie chunks visible because the uneven sizes make the finished bark look more homemade and festive.
Step 2: Spread the melted white chocolate
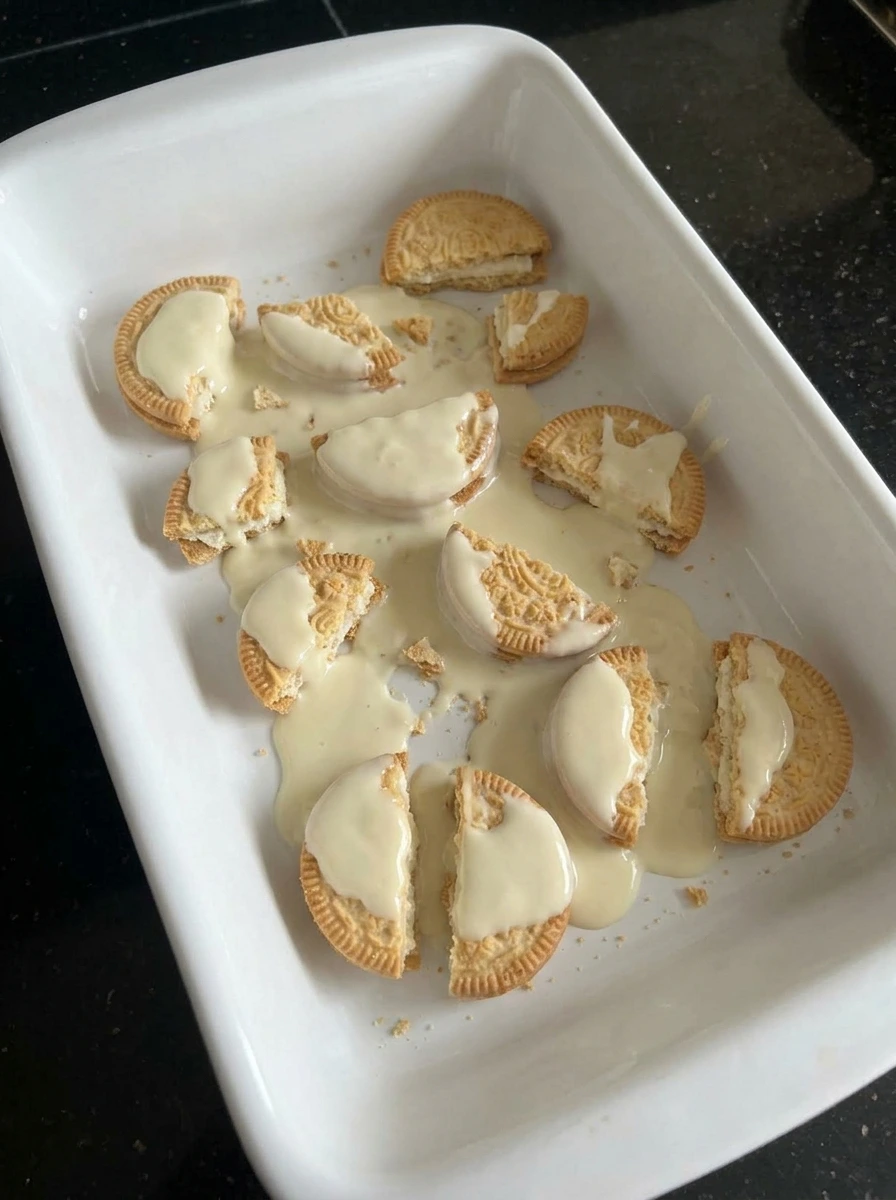
Pour the melted white chocolate over the cookie pieces and meanwhile allow the creamy chocolate to spread unevenly around the cookies. Some cookie pieces should remain partially exposed while others sink slightly into the melted layer. The white chocolate should look glossy thick and softly pooled around the cookie chunks and the cookie crumbs should swirl naturally into the chocolate without complete mixing.
Tip: Pour the chocolate slowly over the cookies so some crunchy pieces stay visible after spreading.
Step 3: Swirl the red and blue candy melts
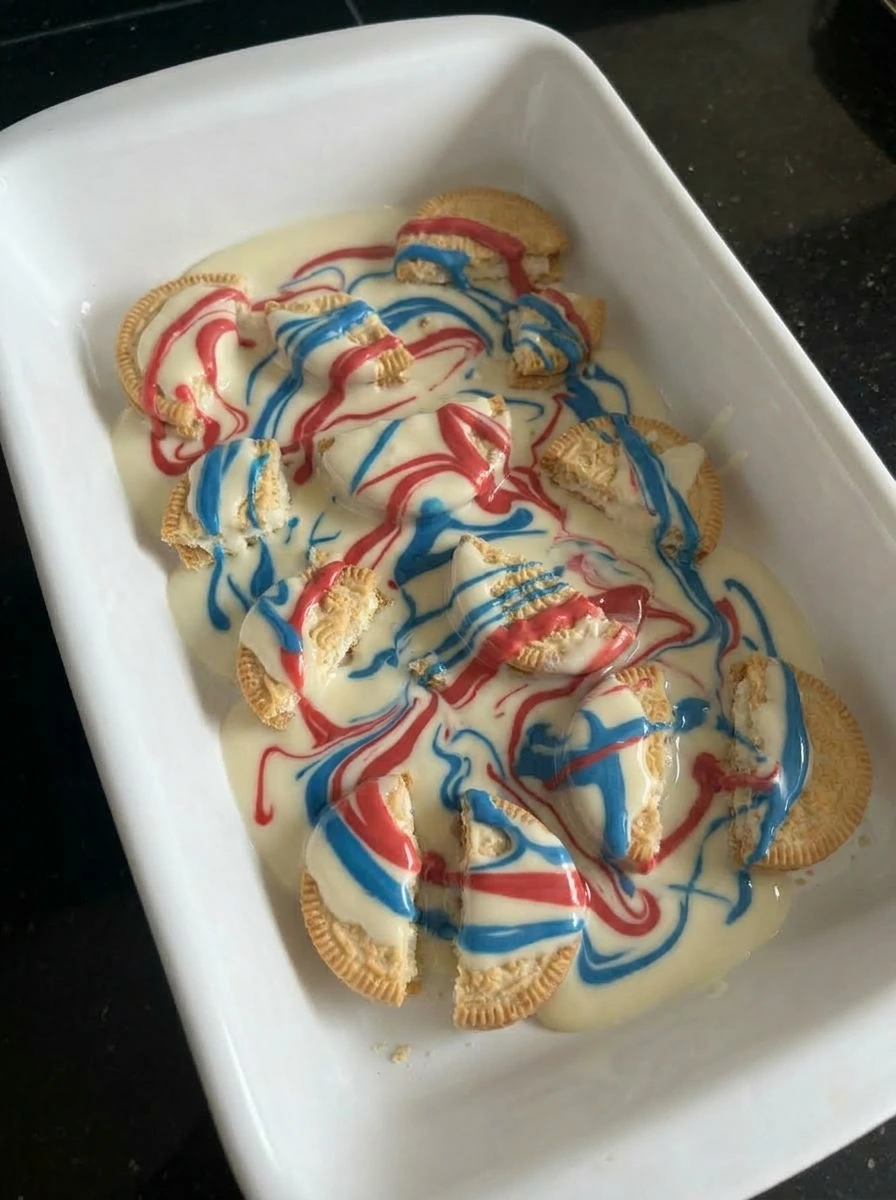
Drizzle the melted red and blue candy melts across the white chocolate surface and meanwhile drag the colors gently into loose swirls and streaks. Some areas should blend slightly while other streaks stay bold and . The bark now develops a colorful marbled texture and the candy melt ribbons create movement and uneven patterns across the creamy base.
Tip: Do not over swirl the colors because distinct red and blue streaks make the bark look brighter and more festive.
Step 4: Scatter the candy toppings
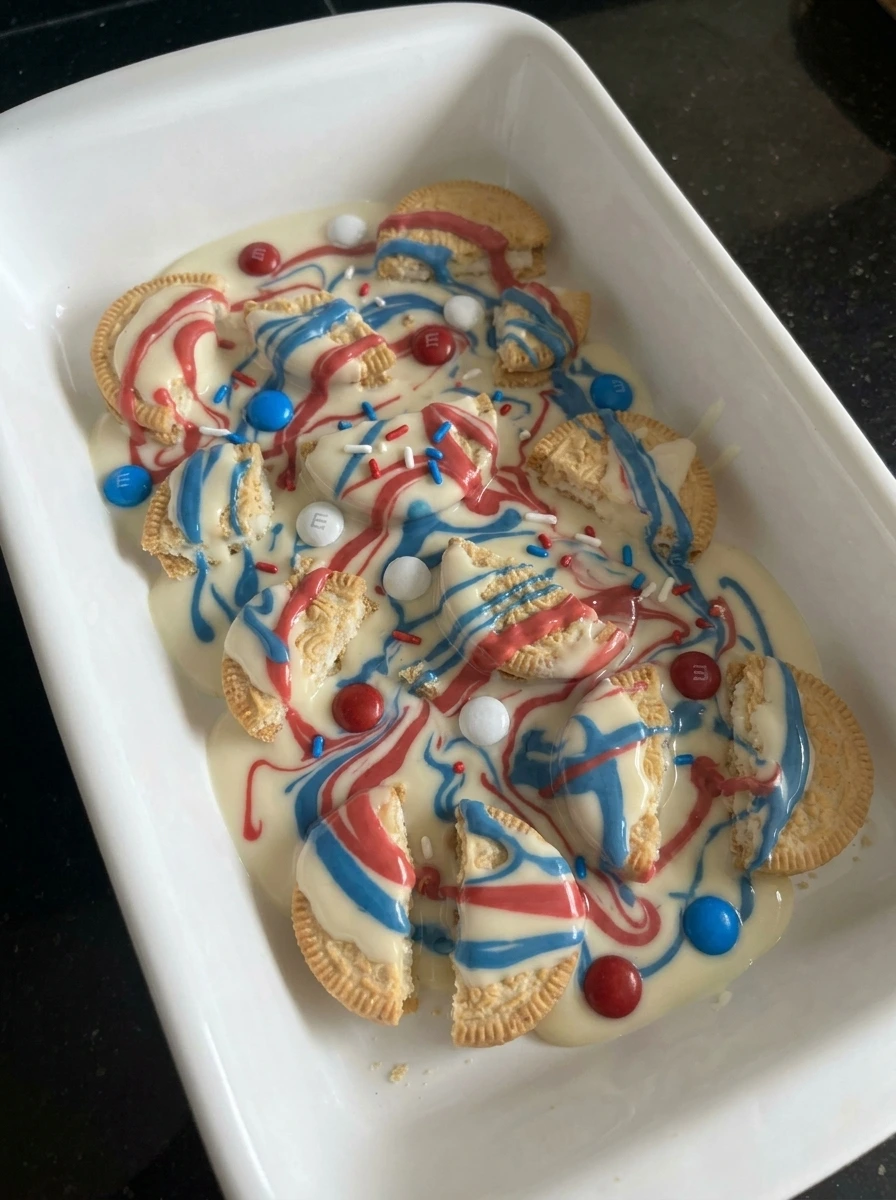
Scatter the candy coated chocolates and patriotic sprinkles across the soft bark surface and meanwhile allow some candies to sink lightly into the melted chocolate while others rest on top. The toppings should look casually tossed instead of carefully arranged. Bright candy colors crunchy textures and scattered sprinkle clusters create a playful party dessert appearance and the bark now looks layered colorful and festive.
Tip: Press a few candies gently into the soft bark so they stay attached after chilling.
Step 5: Break and serve the chilled bark
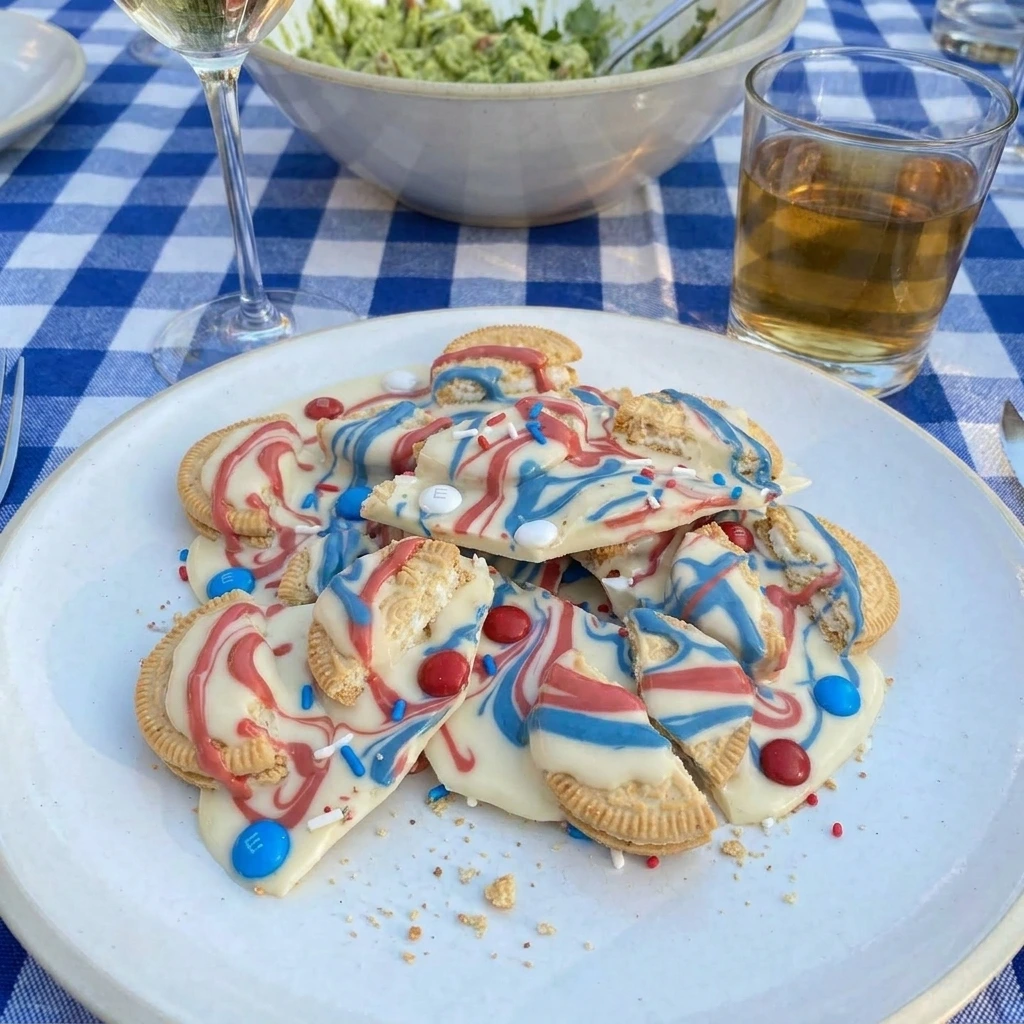
Once chilled and firm break the bark into jagged uneven pieces and meanwhile separate the chunks naturally to reveal colorful swirls crunchy cookies and candy layers inside. Some edges should appear cracked and irregular for a homemade finish. Arrange a single serving portion on a white plate and allow crumbs sprinkles and candy pieces to scatter casually around the bark. The final dessert looks festive crunchy creamy and naturally imperfect.
Tip: Use your hands to break the bark naturally because uneven pieces create the best homemade texture and appearance.
Pro Tips
- Allow the melted chocolate to cool slightly before adding toppings because this keeps the candy colors bright and prevents melting.
- Use uneven cookie chunks instead of perfect pieces because the rough texture creates a more natural homemade bark appearance.
- Chill the bark until fully firm so the broken pieces stay crisp and hold their colorful swirled layers beautifully.
- Scatter toppings casually across the bark because random placement creates a festive homemade dessert look for parties.
Storage Instructions
Store the cookie bark in an airtight container at room temperature and meanwhile keep it away from direct heat or sunlight to maintain the firm chocolate texture. For warmer weather parties place the bark in the refrigerator and allow it to sit at room temperature for a few minutes before serving for the best texture. Separate stacked bark layers with parchment paper and meanwhile this prevents the candy toppings from sticking together during storage. Freeze leftover bark pieces in freezer safe containers and thaw them slowly in the refrigerator before serving again.
Frequently Asked Questions
Yes and meanwhile the bark stays fresh for several days when stored in an airtight container at room temperature.
Yes and freeze the bark in layers separated with parchment paper for up to two months.
Vanilla sandwich cookies work wonderfully because they stay crunchy and balance the sweet melted chocolate layers.
Store the bark in a cool dry area and meanwhile avoid direct sunlight during warm holiday celebrations.
See You in the Kitchen
This Patriotic Red White and Blue Cookie Bark is a fun way to satisfy your holiday dessert cravings without spending hours in the kitchen making complicated treats.
I typically serve this bark alongside Red White and Blue Dirt Cups and meanwhile I love adding Banana Bread Chocolate Chip Cookies for an extra sweet dessert table everyone enjoys together.
Even my kids love this one!
Print
Patriotic Red White and Blue Cookie Bark
- Total Time: 45 minutes
- Yield: 4 servings
Description
Patriotic Red White and Blue Cookie Bark is one of the best easy dessert ideas for every summer holiday and meanwhile this quick and simple treat comes together with melted chocolate crunchy cookies and colorful candy pieces. It is a healthy inspired sweet snack option for parties and potluck tables and furthermore it works perfectly for holiday celebrations backyard parties and fun family dessert nights when you need something festive fast and delicious.
Ingredients
- 3 cups white chocolate chips
- 1/2 cup blue candy melts
- 1/2 cup red candy melts
- 10 cookies vanilla sandwich cookies
- 1 cup red white and blue candy coated chocolates
- 1/4 cup patriotic sprinkles
Instructions
- Break the vanilla sandwich cookies into uneven chunky pieces and meanwhile leave a mixture of large and small pieces for natural texture throughout the dessert. Some crumbs should fall loosely around the larger cookie chunks for a homemade appearance. Scatter the cookie pieces loosely so they overlap naturally and avoid perfectly even shapes or spacing. The rough cookie edges and irregular chunks create a more realistic party dessert texture.
- Pour the melted white chocolate over the cookie pieces and meanwhile allow the creamy chocolate to spread unevenly around the cookies. Some cookie pieces should remain partially exposed while others sink slightly into the melted layer. The white chocolate should look glossy thick and softly pooled around the cookie chunks and the cookie crumbs should swirl naturally into the chocolate without complete mixing.
- Drizzle the melted red and blue candy melts across the white chocolate surface and meanwhile drag the colors gently into loose swirls and streaks. Some areas should blend slightly while other streaks stay bold and . The bark now develops a colorful marbled texture and the candy melt ribbons create movement and uneven patterns across the creamy base.
- Scatter the candy coated chocolates and patriotic sprinkles across the soft bark surface and meanwhile allow some candies to sink lightly into the melted chocolate while others rest on top. The toppings should look casually tossed instead of carefully arranged. Bright candy colors crunchy textures and scattered sprinkle clusters create a playful party dessert appearance and the bark now looks layered colorful and festive.
- Once chilled and firm break the bark into jagged uneven pieces and meanwhile separate the chunks naturally to reveal colorful swirls crunchy cookies and candy layers inside. Some edges should appear cracked and irregular for a homemade finish. Arrange a single serving portion on a white plate and allow crumbs sprinkles and candy pieces to scatter casually around the bark. The final dessert looks festive crunchy creamy and naturally imperfect.
Notes
Pro Tips:
- Allow the melted chocolate to cool slightly before adding toppings because this keeps the candy colors bright and prevents melting.
- Use uneven cookie chunks instead of perfect pieces because the rough texture creates a more natural homemade bark appearance.
- Chill the bark until fully firm so the broken pieces stay crisp and hold their colorful swirled layers beautifully.
- Scatter toppings casually across the bark because random placement creates a festive homemade dessert look for parties.
Storage: Store the cookie bark in an airtight container at room temperature and meanwhile keep it away from direct heat or sunlight to maintain the firm chocolate texture. For warmer weather parties place the bark in the refrigerator and allow it to sit at room temperature for a few minutes before serving for the best texture. Separate stacked bark layers with parchment paper and meanwhile this prevents the candy toppings from sticking together during storage. Freeze leftover bark pieces in freezer safe containers and thaw them slowly in the refrigerator before serving again.
- Prep Time: 15 minutes
- Cook Time: 30 minutes
- Category: Desserts
- Cuisine: American
Nutrition
- Serving Size: 1 piece
- Calories: 320
- Sugar: 28g
- Sodium: 170mg
- Fat: 16g
- Carbohydrates: 42g
- Fiber: 1g
- Protein: 3g
- Cholesterol: 5mg