
Seriously no joke this is the best Raspberry Icebox Cake recipe. It is the one I make when I want a cool creamy dessert that feels homemade and still looks pretty. It is a classic recipe with simple delicious ingredients. Tart raspberries are layered with soft whipped cream and graham crackers until every bite turns creamy and fruity.

Perfect for summer parties or sweet brunch plates with extra berries on the side. A classic Raspberry Icebox Cake recipe is one of my go to easy desserts. Not only does it make for a super delicious treat but it keeps beautifully in the fridge and slices so clean after chilling. Also there are no complicated methods or ingredients needed.
And dessert prep is a cinch. I often make a pan of this cake on Sunday to enjoy after dinner and then save a few chilled slices for Monday and Tuesday. If you love fruity bakes too then try our Nectarine Coffee Cake for another cozy dessert. With just a few basic ingredients probably already in the fridge and pantry you can whip up a layered cake or chilled bars or even scoop it into small cups for a fancy party dish.
Ingredients
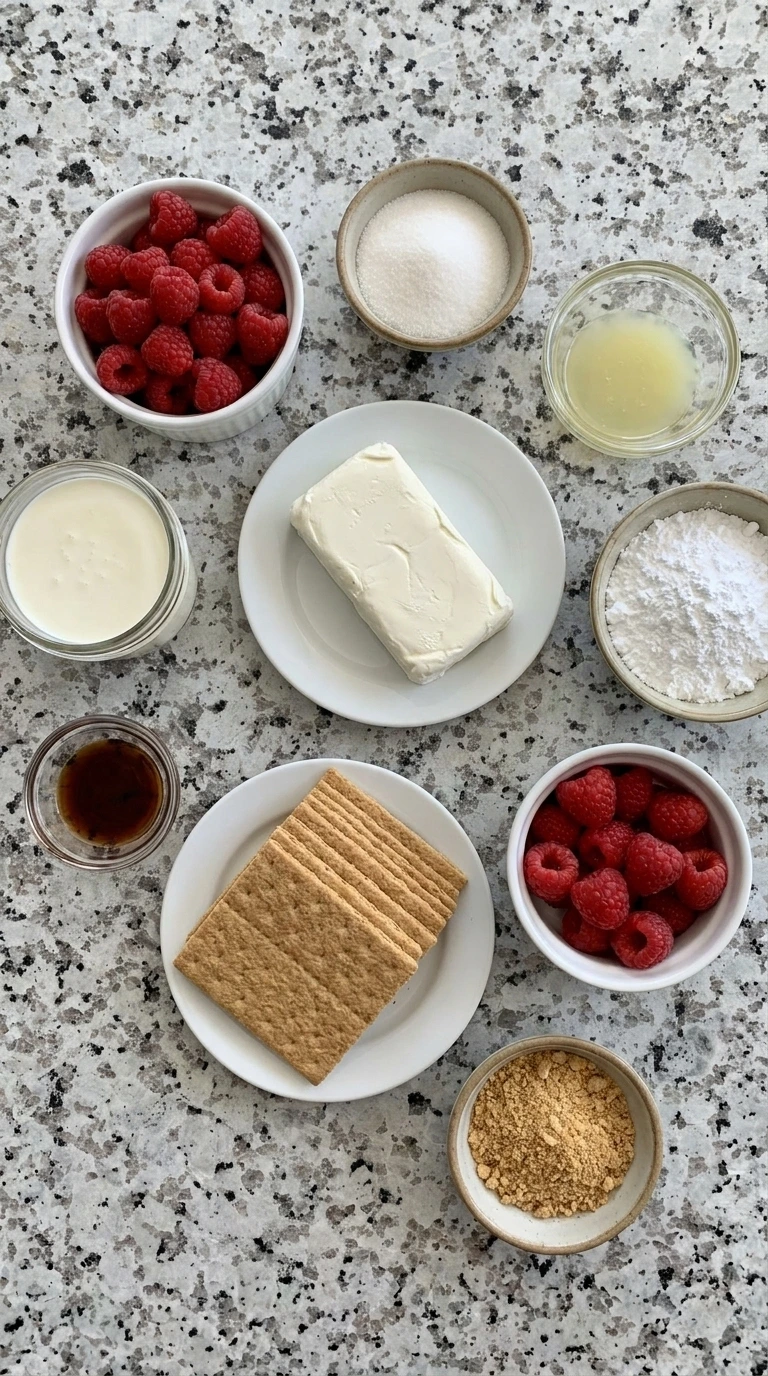
Here is what I use for this recipe and you can adjust nuts or spices based on preference:
- fresh raspberries: Adds bright berry flavor and juicy texture through the creamy layers.
- granulated sugar: Sweetens the raspberries and helps create a lightly syrupy berry layer.
- lemon juice: Balances the sweetness and keeps the raspberry flavor fresh.
- heavy whipping cream: Whips into the fluffy cream that softens the crackers during chilling.
- cream cheese: Gives the filling body and a lightly tangy cheesecake style flavor.
- powdered sugar: Sweetens the cream layer while keeping the texture smooth.
- vanilla extract: Rounds out the cream filling with warm bakery flavor.
- graham crackers: Forms the cake layers and softens into a tender slice after chilling.
- fresh raspberries for topping: Finishes the cake with fresh color and a naturally homemade look.
- crushed graham cracker crumbs: Adds a simple crumb finish and hints at the softened layers inside.
Tools You’ll Need
- Mixing bowl: Used for mashing the raspberry filling and creating the whipped cream mixture.
- Hand mixer: Whips the cream cheese and heavy cream into a thick fluffy filling.
- Rubber spatula: Spreads the cream filling gently without crushing the layers.
- Rectangular baking dish: Holds the graham cracker layers while the cake chills and softens.
- Offset spatula: Smooths the top layer while keeping soft raspberry streaks visible.
- Knife: Cuts clean portions after the cake has fully chilled.
- White plate: Presents one chilled slice with visible creamy layers.
Instructions
Step 1: Mash the raspberries with sugar
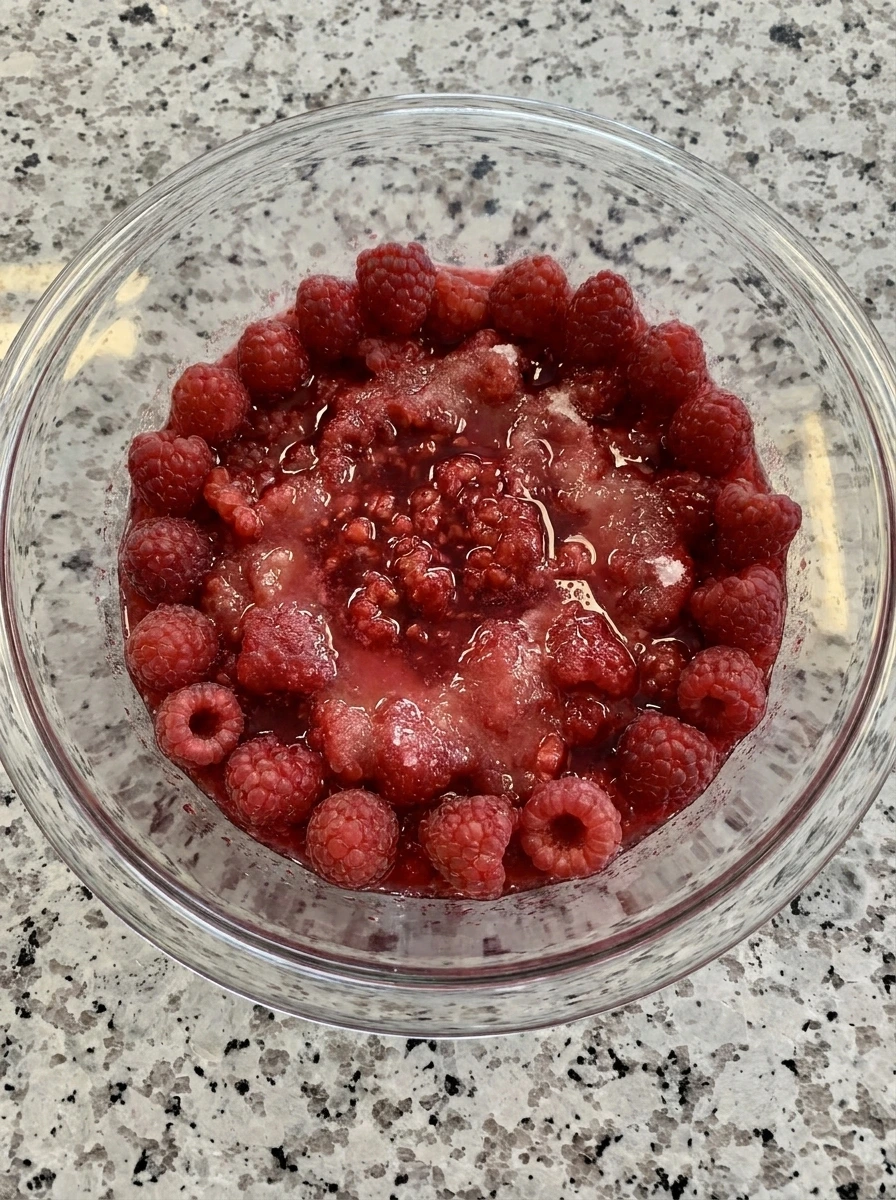
Fresh raspberries turn from whole berries into a chunky ruby mixture as sugar and lemon juice draw out their juices. Some berries stay partly whole while others collapse into syrupy pieces so the layer has both soft fruit and bright pockets of texture.
Tip: Leave some raspberries partly whole so the chilled cake has pretty berry pieces in every slice.
Step 2: Whip the cream cheese filling
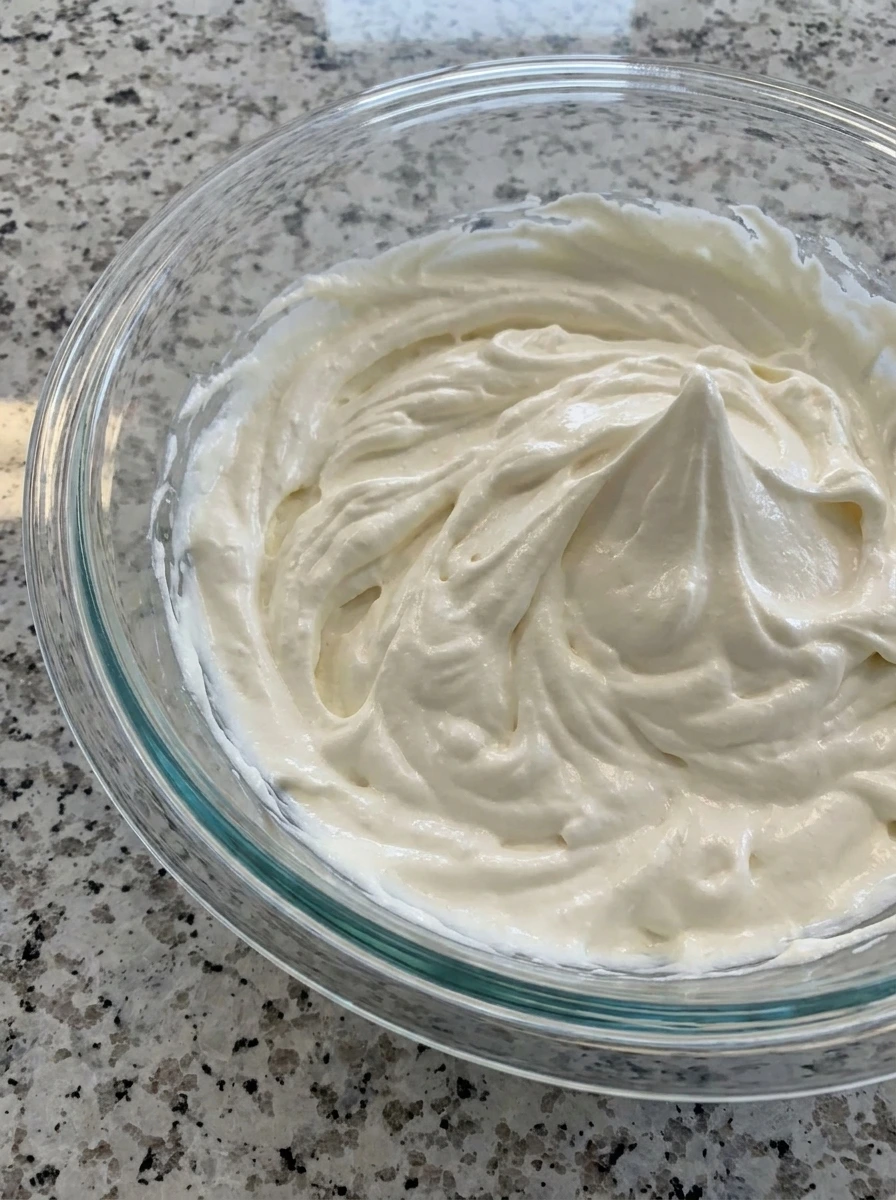
Soft cream cheese blends with powdered sugar and vanilla then heavy cream turns the mixture into a thick fluffy filling. The cream changes from dense and pale to airy and spreadable with small soft peaks and a lightly glossy surface.
Tip: Use softened cream cheese so the filling turns smooth and fluffy without little firm pieces.
Step 3: Start the graham cracker layers
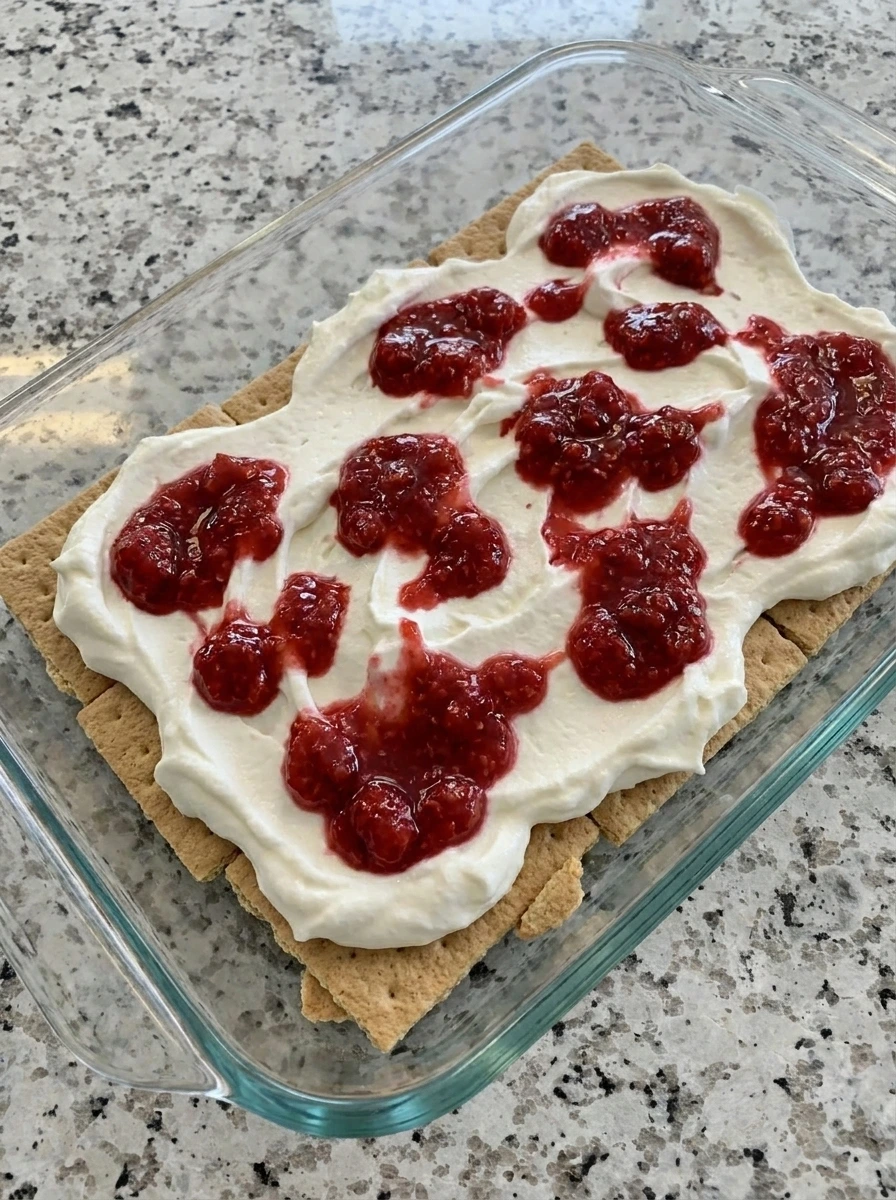
Graham crackers spread across the bottom of the dish and the first layer of cream is smoothed over them in thick uneven waves. Raspberry mixture is spooned over the cream so red streaks begin to sink into the white filling without fully covering it.
Tip: Break a few crackers to fit the dish because uneven edges soften and slice beautifully later.
Step 4: Build the full icebox cake
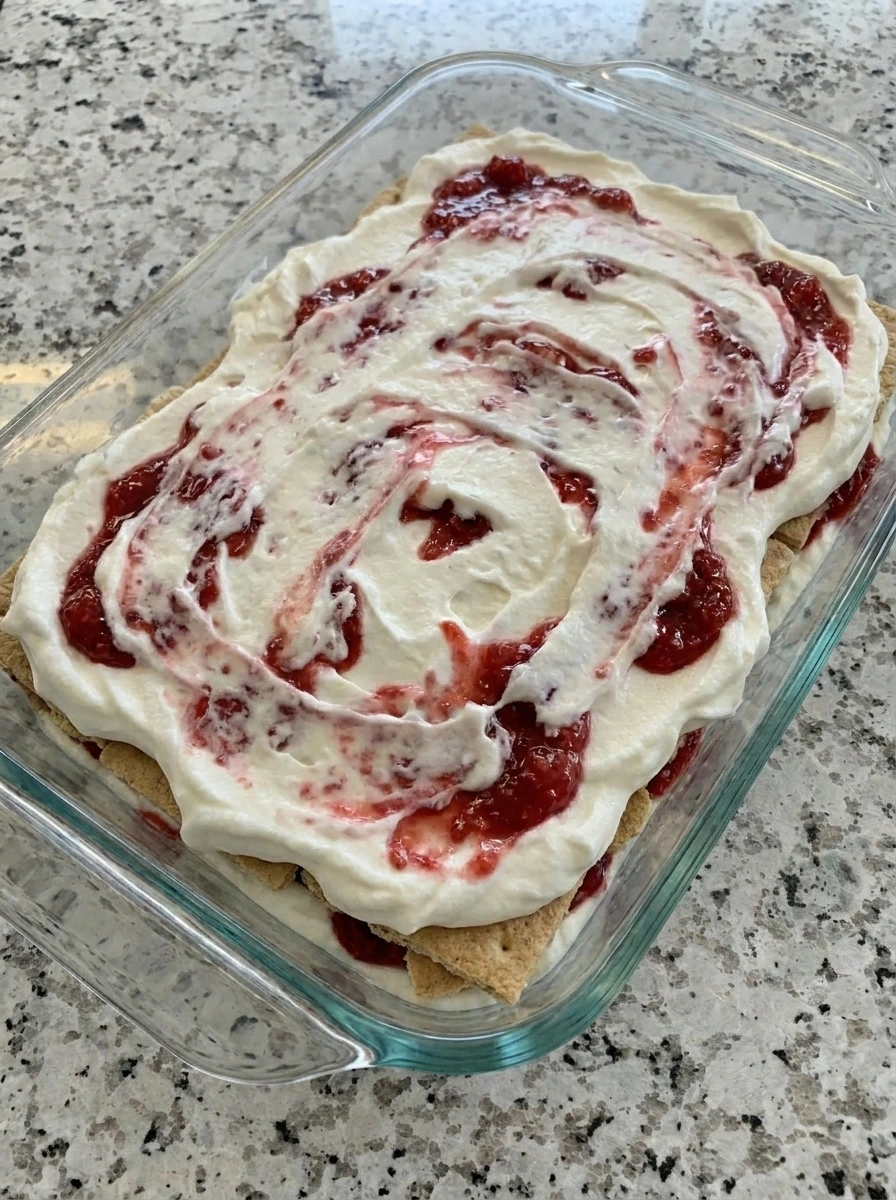
More crackers and cream and raspberry filling stack into visible layers that look thick and slightly uneven. The top becomes creamy with raspberry streaks peeking through and small gaps near the edges that make the cake look homemade.
Tip: Spread the final cream layer gently so the red berry streaks stay visible instead of turning pink.
Step 5: Chill until the layers soften
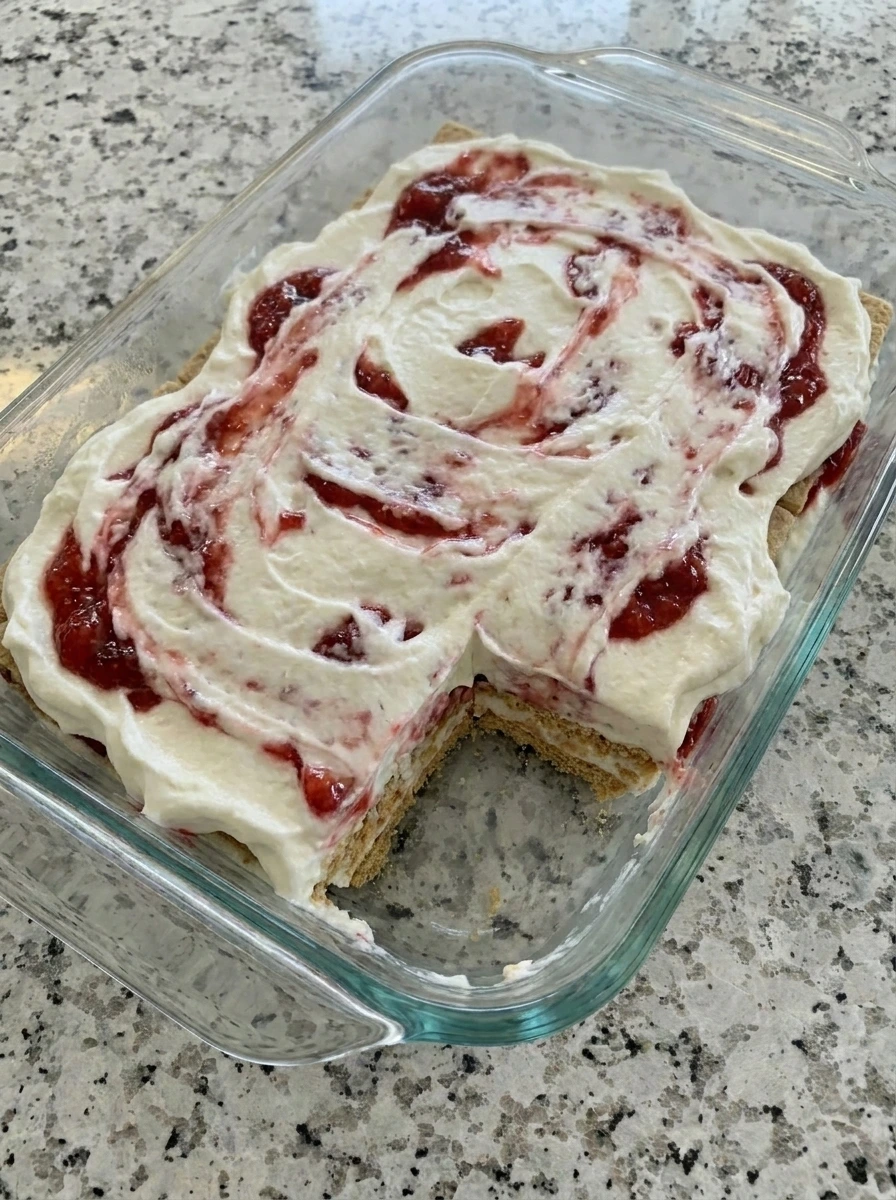
The cake firms in the fridge while the crackers absorb moisture from the cream and berry filling. The once crisp cracker layers soften into a sliceable cake texture and the raspberry juices create soft red ribbons through the cream.
Tip: Chill at least four hours and overnight is even better for clean slices and tender layers.
Step 6: Serve a chilled slice
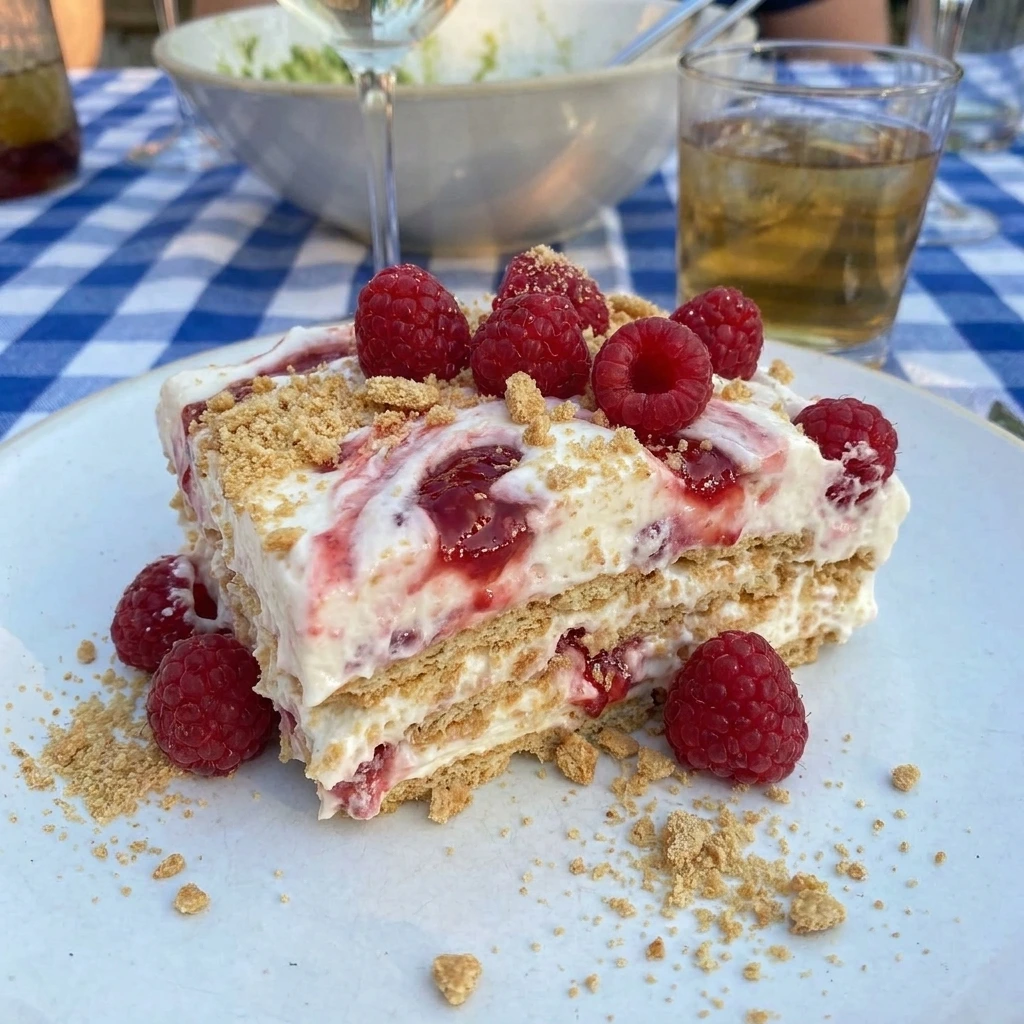
A single slice lifts away from the pan with visible cream layers and softened graham lines and raspberry pockets inside. Fresh raspberries and crumbs sit unevenly on top while the slice leans slightly on the plate with creamy edges and natural homemade texture.
Tip: Wipe the knife between cuts so the creamy layers stay visible while the slice still looks natural.
Pro Tips
- Use ripe raspberries for the brightest flavor and save a few firm berries for a fresh topping.
- Do not overmix the raspberry layer because chunky fruit gives the cake better texture and color.
- Let the cake chill long enough so the crackers soften into tender cake like layers.
- Slice with a clean sharp knife and lift each piece gently to keep the creamy layers intact.
Storage Instructions
Store Raspberry Icebox Cake covered in the refrigerator so the cream stays chilled and the layers stay soft. It keeps well for up to three days although the texture becomes softer each day as the graham crackers absorb more filling. For the cleanest slices chill the cake until very firm before cutting and keep leftovers covered tightly. Freezing is not the best choice because the cream can separate and the raspberries may release extra moisture after thawing.
Frequently Asked Questions
Yes make it the night before so the crackers soften and the cream sets into clean layers.
Chill at least four hours though overnight gives the best creamy texture and neat slices.
Yes thaw and drain them well so the filling stays thick and the cake does not turn watery.
Yes it slices easily and stays cold and creamy which makes it great for potluck or brunch.
See You in the Kitchen
This Raspberry Icebox Cake is a great way to satisfy your creamy berry dessert cravings without turning on the oven.
I typically start the layers earlier in the day and let the fridge do the work that way every slice is ready when dessert time comes around.
Even my kids love this one and if you want another sweet treat try Fig Crumble Bars or Fresh Fig Muffins next.
Print
Raspberry Icebox Cake
- Total Time: 4 hours 15 minutes
- Yield: 8 servings
Description
This Raspberry Icebox Cake is an easy and quick no bake dessert with simple layers of whipped cream and berries and cookies that soften into the best creamy slice. It feels healthy enough with fresh raspberries while still tasting like a party treat. Serve it for brunch and holiday tables and potluck spreads and meal prep dessert ideas when you want something pretty and stress free.
Ingredients
- 3 cups fresh raspberries
- 1/3 cup granulated sugar
- 1 tablespoon lemon juice
- 2 cups heavy whipping cream
- 8 ounces softened cream cheese
- 3/4 cup powdered sugar
- 2 teaspoons vanilla extract
- 18 full sheets graham crackers
- 1/2 cup fresh raspberries for topping
- 2 tablespoons crushed graham cracker crumbs
Instructions
- Fresh raspberries turn from whole berries into a chunky ruby mixture as sugar and lemon juice draw out their juices. Some berries stay partly whole while others collapse into syrupy pieces so the layer has both soft fruit and bright pockets of texture.
- Soft cream cheese blends with powdered sugar and vanilla then heavy cream turns the mixture into a thick fluffy filling. The cream changes from dense and pale to airy and spreadable with small soft peaks and a lightly glossy surface.
- Graham crackers spread across the bottom of the dish and the first layer of cream is smoothed over them in thick uneven waves. Raspberry mixture is spooned over the cream so red streaks begin to sink into the white filling without fully covering it.
- More crackers and cream and raspberry filling stack into visible layers that look thick and slightly uneven. The top becomes creamy with raspberry streaks peeking through and small gaps near the edges that make the cake look homemade.
- The cake firms in the fridge while the crackers absorb moisture from the cream and berry filling. The once crisp cracker layers soften into a sliceable cake texture and the raspberry juices create soft red ribbons through the cream.
- A single slice lifts away from the pan with visible cream layers and softened graham lines and raspberry pockets inside. Fresh raspberries and crumbs sit unevenly on top while the slice leans slightly on the plate with creamy edges and natural homemade texture.
Notes
Pro Tips:
- Use ripe raspberries for the brightest flavor and save a few firm berries for a fresh topping.
- Do not overmix the raspberry layer because chunky fruit gives the cake better texture and color.
- Let the cake chill long enough so the crackers soften into tender cake like layers.
- Slice with a clean sharp knife and lift each piece gently to keep the creamy layers intact.
Storage: Store Raspberry Icebox Cake covered in the refrigerator so the cream stays chilled and the layers stay soft. It keeps well for up to three days although the texture becomes softer each day as the graham crackers absorb more filling. For the cleanest slices chill the cake until very firm before cutting and keep leftovers covered tightly. Freezing is not the best choice because the cream can separate and the raspberries may release extra moisture after thawing.
- Prep Time: 15 minutes
- Cook Time: 0 minute
- Category: Desserts
- Cuisine: American
Nutrition
- Serving Size: 1 slice
- Calories: 360
- Sugar: 26g
- Sodium: 170mg
- Fat: 22g
- Carbohydrates: 38g
- Fiber: 4g
- Protein: 5g
- Cholesterol: 65mg