
Our family discovered these Cotton Candy Cheesecake Bombs during the height of summer and meanwhile our boys were hosting a cousin from Detroit at our remote lake cottage and they spent every afternoon racing through the sprinklers and staying up late beside the bonfire.
That was one of my favorite weeks of the year and these easy cheesecake treats quickly became one of my favorite colorful dessert ideas and meanwhile we also kept serving Patriotic Chocolate Covered Strawberries with Drizzle for the late night snack table.
I will never forget the first time I made these sweet cheesecake bombs and the look on the kids faces when they pulled apart the creamy centers and fluffy candy coating and meanwhile everyone kept asking for another batch before the evening even ended.
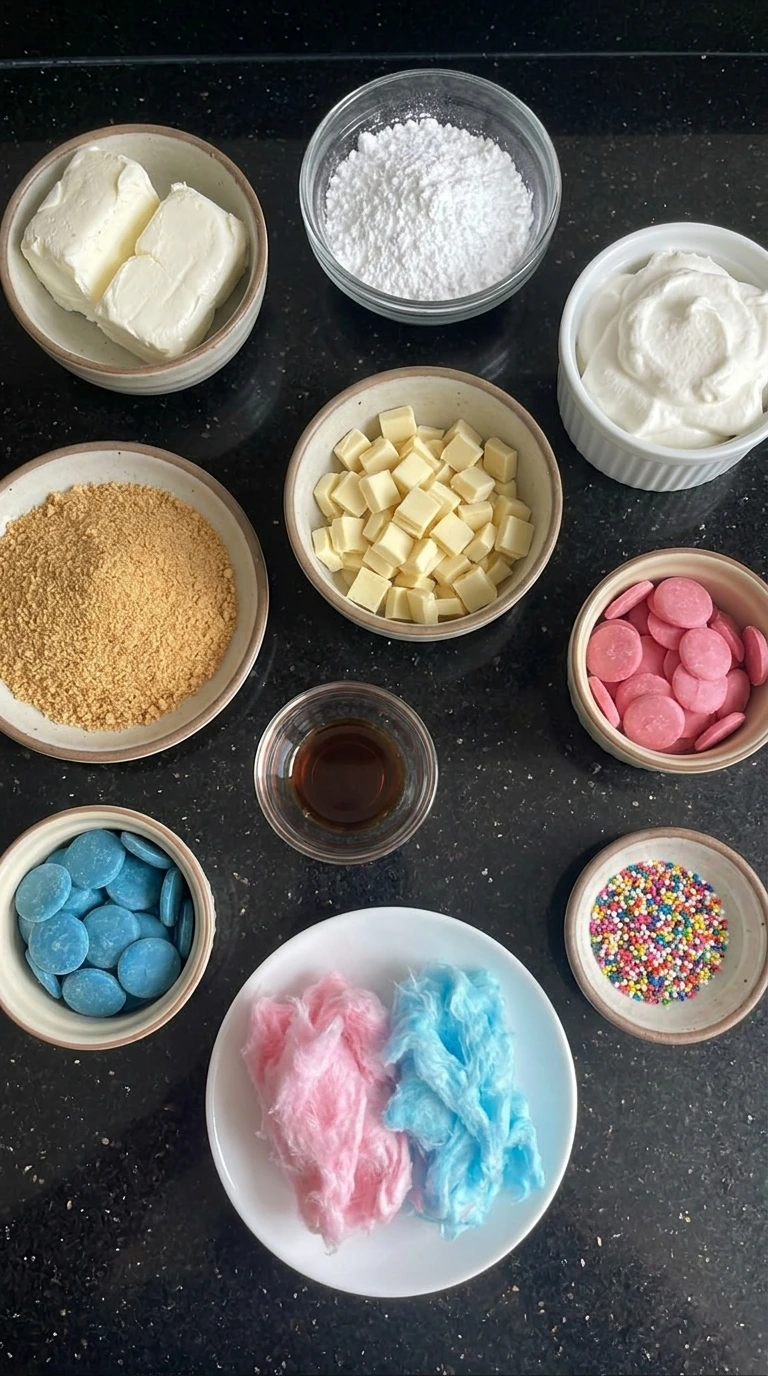
Ingredients
Here is what I use for this recipe and you can adjust nuts or spices based on preference:
- cream cheese: Softened cream cheese creates the rich and creamy cheesecake center.
- powdered sugar: Powdered sugar sweetens the filling while keeping the texture smooth.
- vanilla extract: Vanilla extract adds warm bakery flavor throughout the cheesecake mixture.
- whipped topping: Whipped topping lightens the cheesecake filling and creates airy texture.
- graham cracker crumbs: Graham cracker crumbs add sweet cookie texture and help form the base coating.
- white chocolate: Melted white chocolate creates the outer shell around the cheesecake bombs.
- pink candy melts: Pink candy melts add bright color and sweet candy flavor.
- blue candy melts: Blue candy melts create colorful contrast in the coating.
- cotton candy: Cotton candy adds fluffy sweetness and playful texture for decoration.
- sprinkles: Colorful sprinkles create festive texture and decoration on the finished treats.
Tools You’ll Need
- mixing bowl: Used for blending the cheesecake filling.
- hand mixer: Used for whipping the cream cheese mixture until smooth.
- small cookie scoop: Used for portioning even cheesecake balls.
- baking tray: Used for chilling the cheesecake balls during preparation.
- microwave safe bowls: Used for melting chocolate and candy melts.
Instructions
Step 1: Whip the cheesecake filling
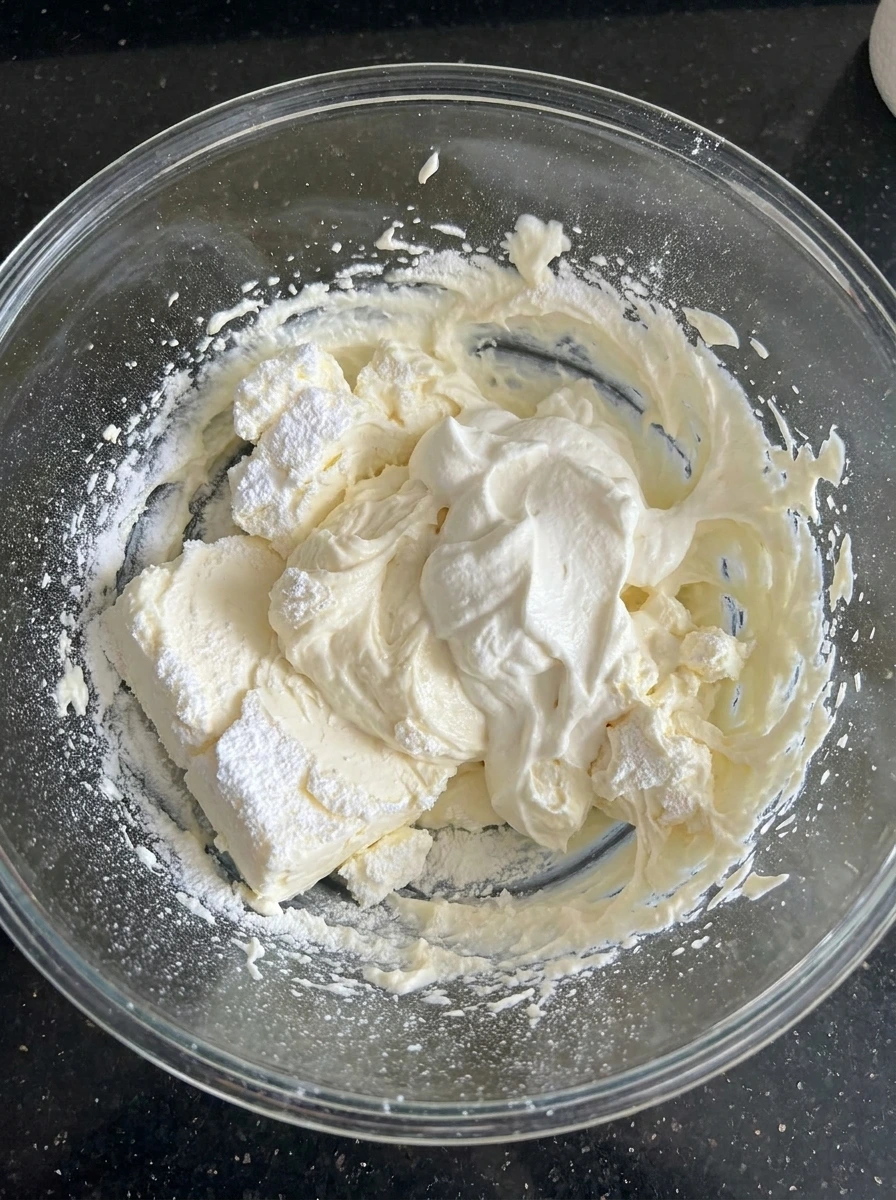
Beat the softened cream cheese and powdered sugar together until the mixture looks thick and fluffy and meanwhile the texture changes from dense blocks into a smooth creamy filling. Fold the whipped topping into the mixture until soft swirls form throughout the bowl and meanwhile the filling becomes lighter and slightly airy with uneven creamy peaks.
Tip: Softened cream cheese blends faster and creates a smoother filling without lumps.
Step 2: Shape the cheesecake balls
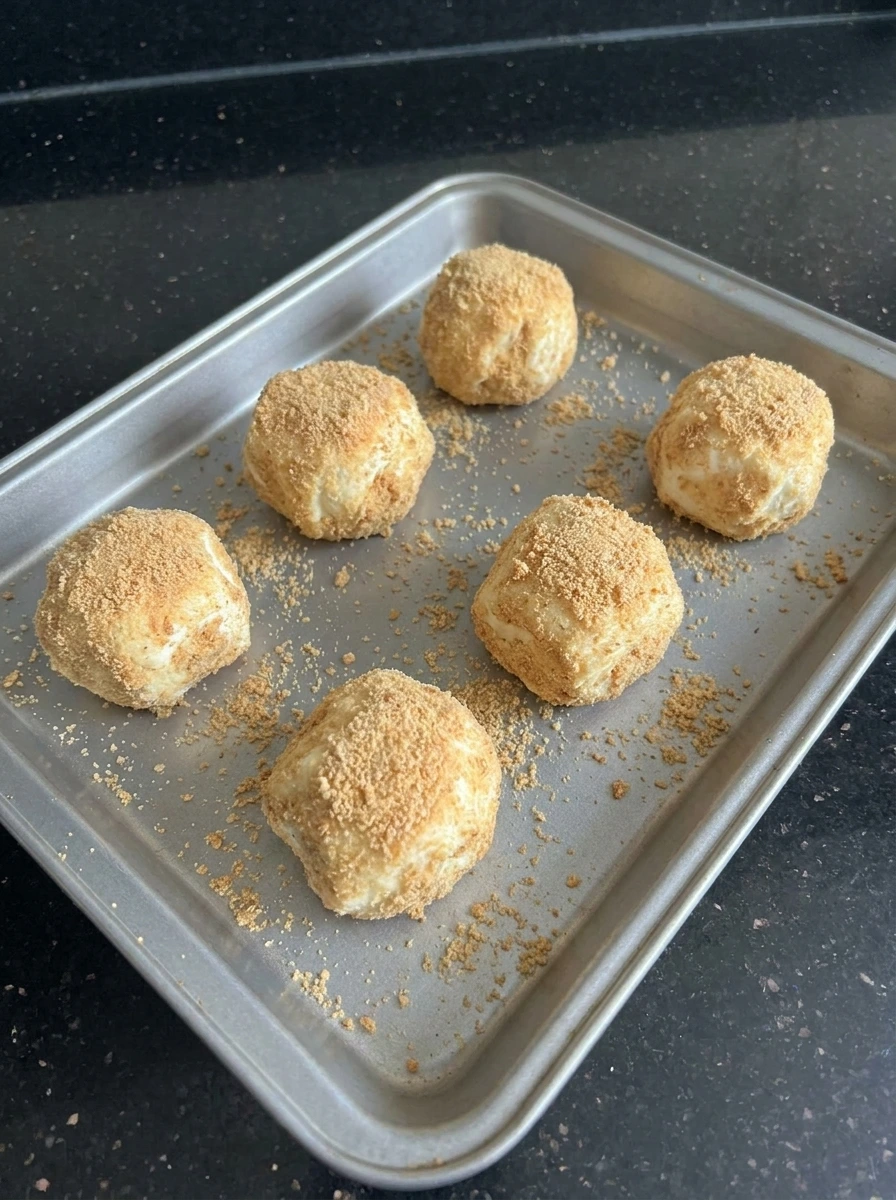
Scoop the cheesecake filling into small uneven balls and roll them through the graham cracker crumbs until the surfaces look lightly coated and slightly textured. Transfer the coated cheesecake balls onto a tray and meanwhile the crumb coating settles unevenly around the soft filling creating natural homemade shapes.
Tip: Slightly chill the filling before shaping so the cheesecake balls hold their shape more easily.
Step 3: Cover the bombs with melted candy
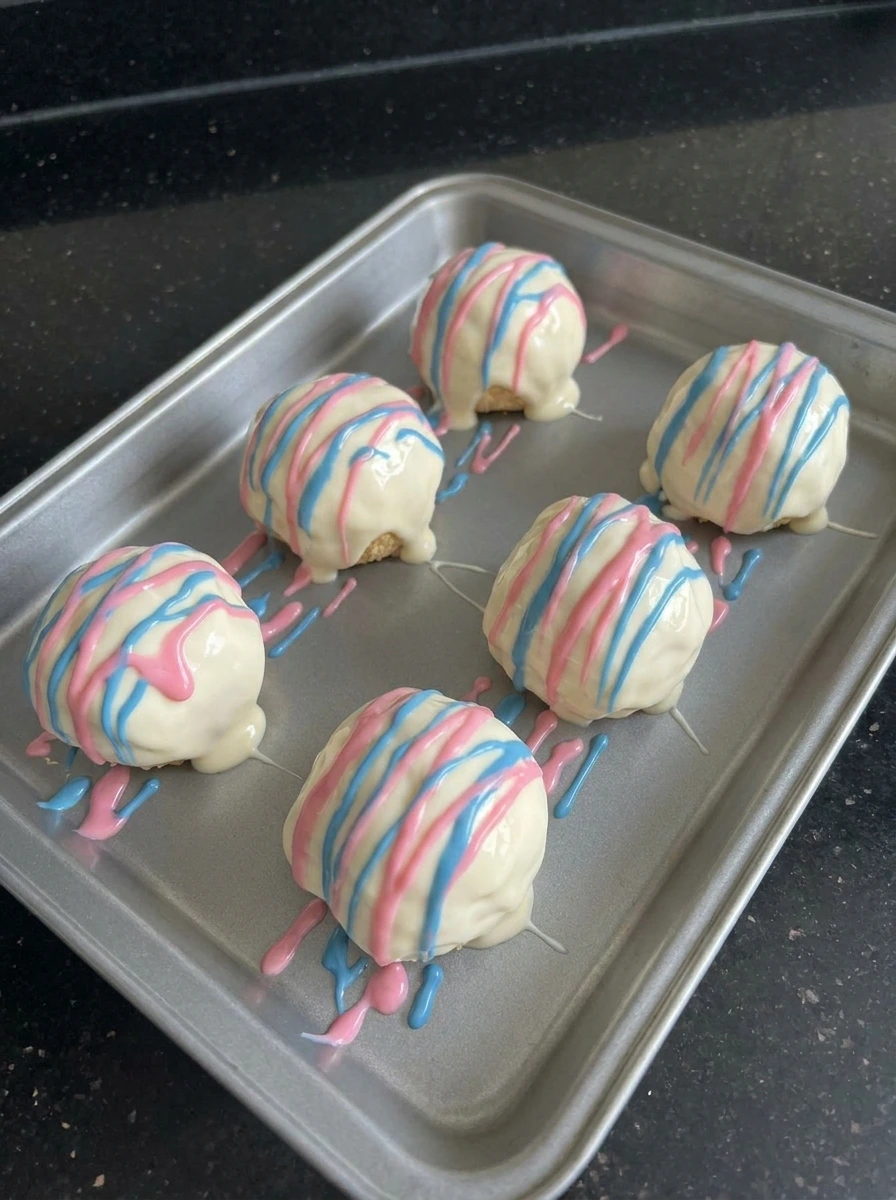
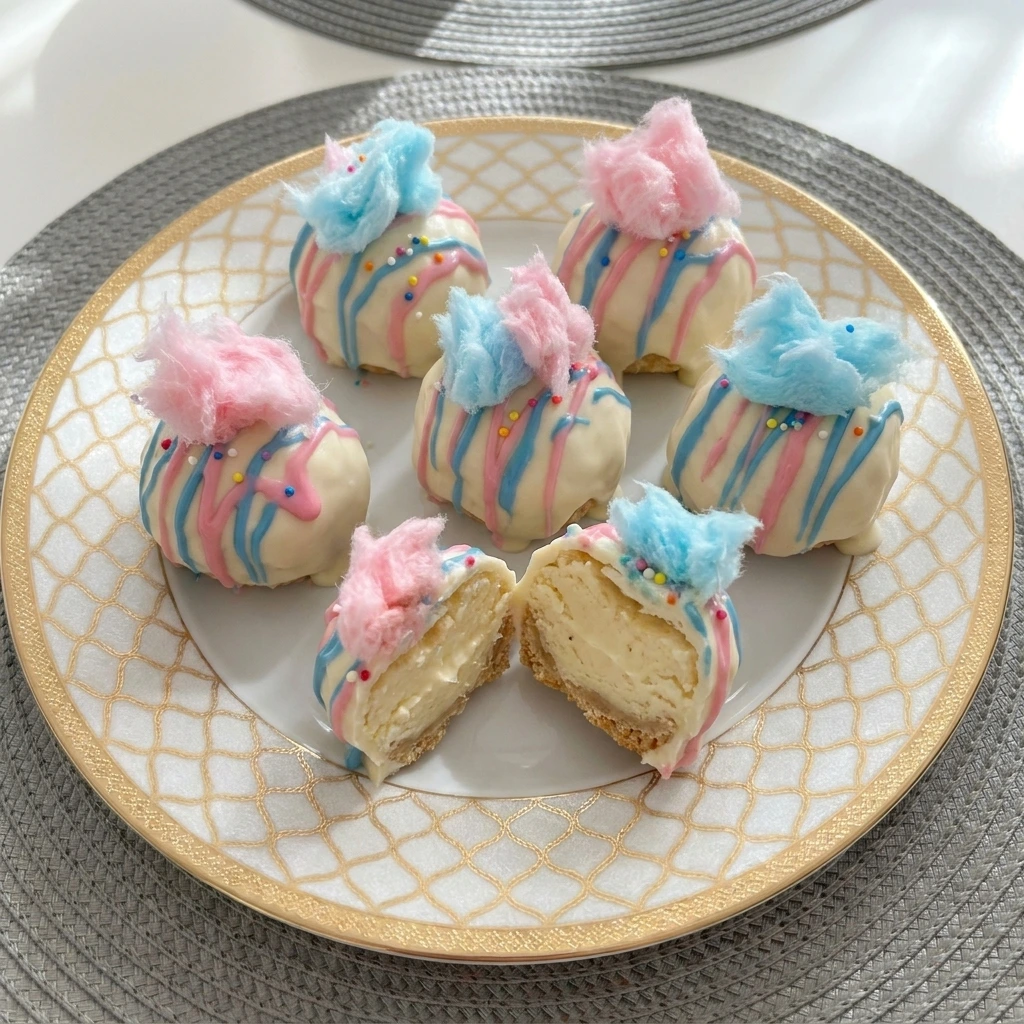
Dip the cheesecake balls into melted white chocolate and drizzle pink and blue candy melts across the tops and meanwhile the smooth coating thickens around the chilled centers. Allow the candy coating to settle naturally with uneven drips and colorful streaks forming around the sides of each cheesecake bomb.
Tip: Work quickly while the candy coating stays fluid so the drizzle settles naturally.
Step 4: Finish with cotton candy and sprinkles
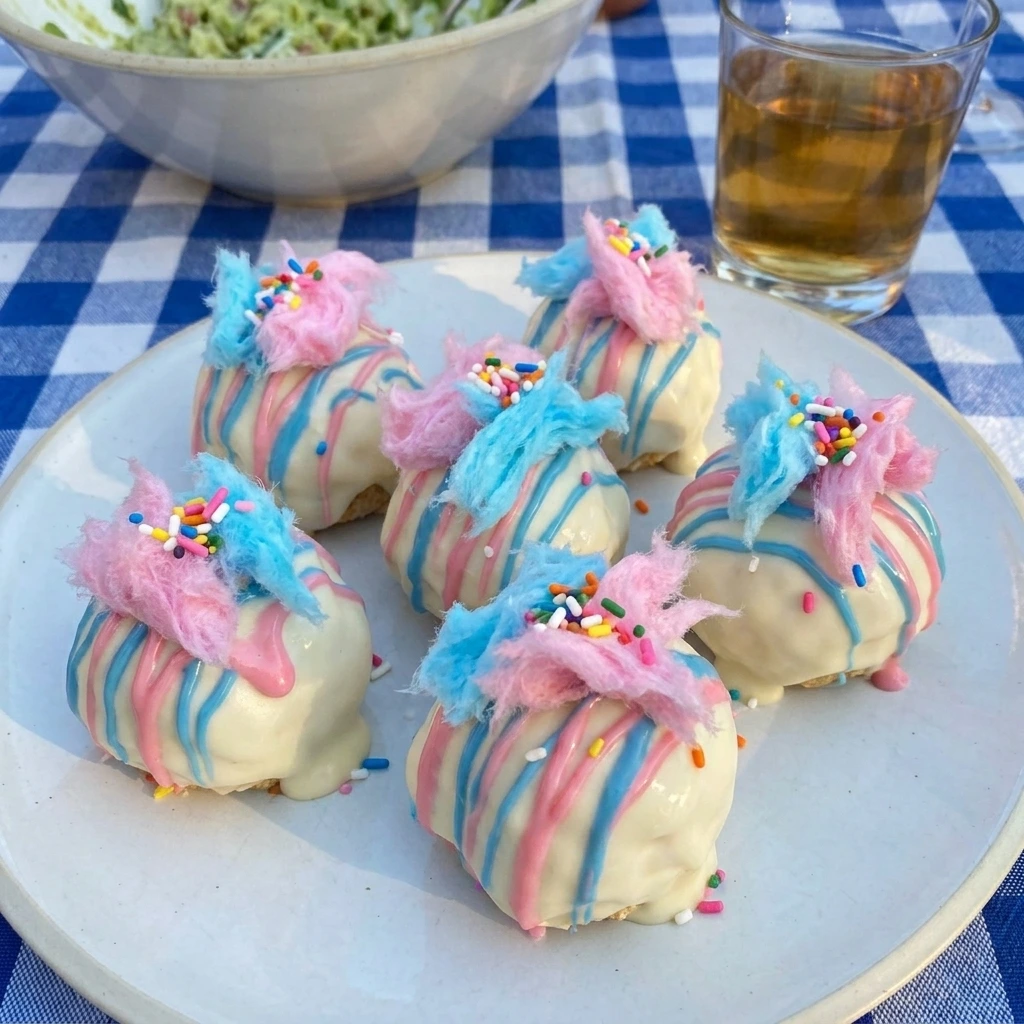
Scatter fluffy cotton candy pieces and colorful sprinkles across the coated cheesecake bombs and meanwhile the bright toppings cling unevenly to the soft candy shell. The finished treats look colorful and playful with creamy centers and textured candy coating and slightly irregular decoration on every piece.
Tip: Add the cotton candy immediately before serving so it stays fluffy and soft.
Pro Tips
- Chill the cheesecake filling before dipping so the candy coating hardens faster and stays smooth around the edges.
- Use slightly uneven cotton candy pieces so the finished cheesecake bombs look playful and naturally homemade.
- Let the melted candy coating drip naturally instead of smoothing every edge for a softer bakery style finish.
- Store the cotton candy separately until serving time so the fluffy texture stays light and colorful longer.
Storage Instructions
Store the Cotton Candy Cheesecake Bombs inside an airtight container in the refrigerator and meanwhile keep the cotton candy topping separate until serving time. The cheesecake filling stays creamy for up to three days and meanwhile the candy shell keeps its smooth texture when chilled properly. If stacking the cheesecake bombs place parchment paper between layers and meanwhile avoid pressing them together because the coating can crack. For longer storage freeze the cheesecake bombs without cotton candy topping and meanwhile thaw them overnight in the refrigerator before decorating. Avoid leaving the cheesecake bombs at room temperature for extended periods because the fluffy candy topping can quickly soften and collapse.
Frequently Asked Questions
Keep the cheesecake bombs chilled until serving time so the candy coating stays firm and the filling remains creamy.
You can prepare the cheesecake bombs one day ahead and add the cotton candy topping right before serving.
The cream cheese filling stays freshest when refrigerated and the chilled texture also improves the flavor.
Freeze the cheesecake bombs without cotton candy topping and thaw gently before decorating and serving.
See You in the Kitchen
I hope you try these Cotton Candy Cheesecake Bombs soon and meanwhile they are a simple dessert that looks colorful and tastes unforgettable for every celebration.
Don’t forget to save this recipe for later and meanwhile if you love playful sweet treats you should also try Banana Pudding Brownies and Easy Berry Crumble Bars for Memorial Day Parties.
Print
Cotton Candy Cheesecake Bombs
- Total Time: 45 minutes
- Yield: 4 servings
Description
These Cotton Candy Cheesecake Bombs are the best easy dessert ideas for birthdays and holiday party tables and meanwhile they bring quick and simple fun to every celebration. The creamy cheesecake center and fluffy candy coating create a healthy style homemade treat that looks colorful and festive without difficult steps. These sweet cheesecake bites are perfect for brunch and potluck spreads and family movie nights and they stay deliciously soft and creamy after chilling.
Ingredients
- 16 ounces cream cheese
- 1 cup powdered sugar
- 1 teaspoon vanilla extract
- 1 cup whipped topping
- 1 1/2 cups graham cracker crumbs
- 12 ounces white chocolate
- 6 ounces pink candy melts
- 6 ounces blue candy melts
- 2 cups cotton candy
- 1/4 cup sprinkles
Instructions
- Beat the softened cream cheese and powdered sugar together until the mixture looks thick and fluffy and meanwhile the texture changes from dense blocks into a smooth creamy filling. Fold the whipped topping into the mixture until soft swirls form throughout the bowl and meanwhile the filling becomes lighter and slightly airy with uneven creamy peaks.
- Scoop the cheesecake filling into small uneven balls and roll them through the graham cracker crumbs until the surfaces look lightly coated and slightly textured. Transfer the coated cheesecake balls onto a tray and meanwhile the crumb coating settles unevenly around the soft filling creating natural homemade shapes.
- Dip the cheesecake balls into melted white chocolate and drizzle pink and blue candy melts across the tops and meanwhile the smooth coating thickens around the chilled centers. Allow the candy coating to settle naturally with uneven drips and colorful streaks forming around the sides of each cheesecake bomb.
- Scatter fluffy cotton candy pieces and colorful sprinkles across the coated cheesecake bombs and meanwhile the bright toppings cling unevenly to the soft candy shell. The finished treats look colorful and playful with creamy centers and textured candy coating and slightly irregular decoration on every piece.
Notes
Pro Tips:
- Chill the cheesecake filling before dipping so the candy coating hardens faster and stays smooth around the edges.
- Use slightly uneven cotton candy pieces so the finished cheesecake bombs look playful and naturally homemade.
- Let the melted candy coating drip naturally instead of smoothing every edge for a softer bakery style finish.
- Store the cotton candy separately until serving time so the fluffy texture stays light and colorful longer.
Storage: Store the Cotton Candy Cheesecake Bombs inside an airtight container in the refrigerator and meanwhile keep the cotton candy topping separate until serving time. The cheesecake filling stays creamy for up to three days and meanwhile the candy shell keeps its smooth texture when chilled properly. If stacking the cheesecake bombs place parchment paper between layers and meanwhile avoid pressing them together because the coating can crack. For longer storage freeze the cheesecake bombs without cotton candy topping and meanwhile thaw them overnight in the refrigerator before decorating. Avoid leaving the cheesecake bombs at room temperature for extended periods because the fluffy candy topping can quickly soften and collapse.
- Prep Time: 15 minutes
- Cook Time: 30 minutes
- Category: Desserts
- Cuisine: American
Nutrition
- Serving Size: 2 cheesecake bombs
- Calories: 420
- Sugar: 32g
- Sodium: 210mg
- Fat: 24g
- Carbohydrates: 45g
- Fiber: 1g
- Protein: 5g
- Cholesterol: 45mg