
I dive into this chocolate silk pie with so much excitement because I know how irresistible each creamy slice turns out and I want you to feel that same thrill as you make it. I’m starting this recipe with the focus keyphrase chocolate silk pie right up front because it helps set the tone for the rich luscious dessert we’re about to create together. When I think of this pie I always picture that first velvety spoonful and it instantly inspires me to get baking.

I love how the process begins with a simple dough resting on the counter because that small step sets the foundation for a flaky golden crust. As I press and shape the dough I’m already imagining the silky chocolate filling that will sit inside it like a smooth decadent cloud. And when I start melting the chocolate I can feel the entire kitchen begin to shift into dessert mode bringing that warm comforting aroma that always makes me stop and smile.
When I fold the chopped chocolate into the creamy mixture I feel like I’m building layers of richness that are going to pay off with every bite. It’s one of those recipes where I enjoy every step slowing down long enough to appreciate how beautifully the ingredients come together. I’m always amazed at how simple it is to turn a handful of pantry staples into something so elegant.

And as I swirl the silky filling into the cooled crust I get this little burst of satisfaction because this is the moment the pie transforms from ingredients to pure indulgence. I can’t wait for you to slice into it later because whether you serve it chilled or slightly softened it’s guaranteed to impress anyone at your table.
Ingredients
Here’s what I use for this recipe and you can always make substitutions if you prefer!
- Pie crust dough – Creates the base that supports the creamy filling.
- Unsalted butter – Adds richness and helps achieve that silky smooth texture.
- Dark chocolate – Brings deep chocolate flavor with luxurious intensity.
- Sugar – Sweetens the filling just enough without overpowering it.
- Eggs – Give structure and thickness to the chocolate mixture.
- Vanilla extract – Adds warmth and enhances the chocolate notes.
- Whipped cream – Lightens the final topping and adds a cloudlike finish.
- Chocolate shavings – Provide texture and visual appeal on top.
Tools You’ll Need
- Mixing bowl – I use this to mix the chocolate and cream into a smooth filling.
- Saucepan – Helps me melt the chocolate gently without burning it.
- Rolling pin – Essential for shaping the pie crust evenly.
- Pie dish – Holds the crust and filling securely while it chills.
- Whisk or electric mixer – Ensures the filling becomes perfectly silky.
- Spatula – Helps me swirl and smooth the filling.
- Cooling rack – Lets the crust cool before adding the filling.
Instructions
Step 1: Prepare the Crust

I start by rolling out the dough and pressing it into the pie dish making sure the edges look neat and even.
Step 2: Bake the Crust
I bake the crust until golden then I let it cool completely because the filling sets best in a cool crust.
Step 3: Melt the Chocolate
I melt the chocolate gently in a saucepan stirring until smooth.
Step 4: Whip the Butter and Sugar

I combine softened butter and sugar until fluffy then I slowly add the melted chocolate.
Step 5: Add the Eggs
I whisk in the eggs one at a time making sure each one blends in fully to create a smooth airy texture.
Step 6: Add Vanilla
I stir in vanilla to deepen the flavor.
Step 7: Fill the Crust

I pour the chocolate filling into the cooled crust and smooth the top with a spatula.
Step 8: Chill
I refrigerate the pie for at least 4 hours so the filling becomes firm and silky.
Step 9: Garnish

Before serving I top it with whipped cream and chocolate shavings.
Tips
I always recommend using high-quality dark chocolate because it makes a huge difference in the final flavor. If you want a lighter texture you can fold in a bit of whipped cream to the filling before chilling. Sometimes I even add a pinch of espresso powder because it enhances the chocolate without making the pie taste like coffee.
Ways to Serve
I love serving this chocolate silk pie chilled because the filling holds its shape beautifully and the texture becomes luxuriously smooth. You can add a dollop of homemade whipped cream or sprinkle extra chocolate shavings for a special touch. If you prefer something extra decadent you can drizzle a thin ribbon of warm chocolate sauce over the top or pair it with a scoop of vanilla ice cream for a perfect balance of cool and creamy.
Storage Instructions
I store leftover pie in the refrigerator loosely covered and it stays delicious for up to four days. If you want to freeze it I recommend wrapping individual slices tightly because they thaw beautifully and make an easy ready-to-serve treat. When thawing I let it soften slightly in the fridge to keep the texture silky and smooth.

Frequently Asked Questions
Can I make chocolate silk pie without eggs?
Yes you can use an eggless chocolate mousse but the texture will be slightly softer.
Why isn’t my chocolate silk pie firm?
It may need more chilling time or the butter may have been too soft.
Can I use milk chocolate instead of dark chocolate in chocolate silk pie?
Yes but the filling will be sweeter and less rich.
How long should chocolate silk pie chill?
At least 4 hours but overnight gives the best sliceable texture.
See You in the Kitchen
I hope you make this chocolate silk pie soon because it brings such joy with every creamy bite. I’d love to hear how it turns out so feel free to share your results and save this recipe for every time you want a showstopping dessert.
Happy Cooking!
Print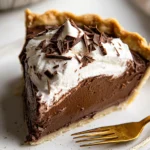
Chocolate Silk Pie
- Total Time: 4 hours 45 minutes
- Yield: 8 slices
- Diet: Vegetarian
Description
Looking for the best chocolate silk pie recipe This one is quick easy and simple with creamy filling and flaky crust perfect for healthy dessert ideas holidays or special occasions A rich and delicious pie that is easy enough for beginners and impressive every time.
Ingredients
- 1 pie crust
- 1 cup unsalted butter
- 8 oz dark chocolate
- 1 cup sugar
- 3 eggs
- 1 tsp vanilla extract
- Whipped cream
- Chocolate shavings
Instructions
- Roll out pie dough and press into dish.
- Bake crust until golden then cool completely.
- Melt chocolate in saucepan.
- Beat butter and sugar until fluffy.
- Add melted chocolate and mix well.
- Add eggs one at a time blending fully.
- Stir in vanilla.
- Pour filling into crust and smooth top.
- Refrigerate for 4 hours.
- Top with whipped cream and chocolate shavings.
Notes
- Use high-quality chocolate for best flavor.
- Add espresso powder to enhance richness.
- Fold whipped cream into filling for a lighter texture.
- Prep Time: 25 minutes
- Cook Time: 20 minutes
- Category: Dessert
- Method: No-Bake Filling
- Cuisine: American
Nutrition
- Serving Size: 1 slice
- Calories: 450
- Sugar: 35g
- Sodium: 190mg
- Fat: 32g
- Saturated Fat: 18g
- Unsaturated Fat: 12g
- Trans Fat: 0g
- Carbohydrates: 48g
- Fiber: 3g
- Protein: 5g
- Cholesterol: 110mg